Sunday, November 16, 2014

DIY detailing w/ clay bar

Why should I have to detail my own car?

The answer is simple!

If giving your car a car wash is equivalent to you taking a shower, then detailing your car is equivalent to doing your hair and making sure you look just a little nicer before you go out for a night on the town.

DIY: Do it Yourself

Why do so many people choose to detail their own cars versus taking it into a shop or a professional to do? Well the answer is relatively simple, not only does it save you money (for labor) but detailing your car builds a personal relationship with your car and makes you more aware of how you treat your car when you clean it up.


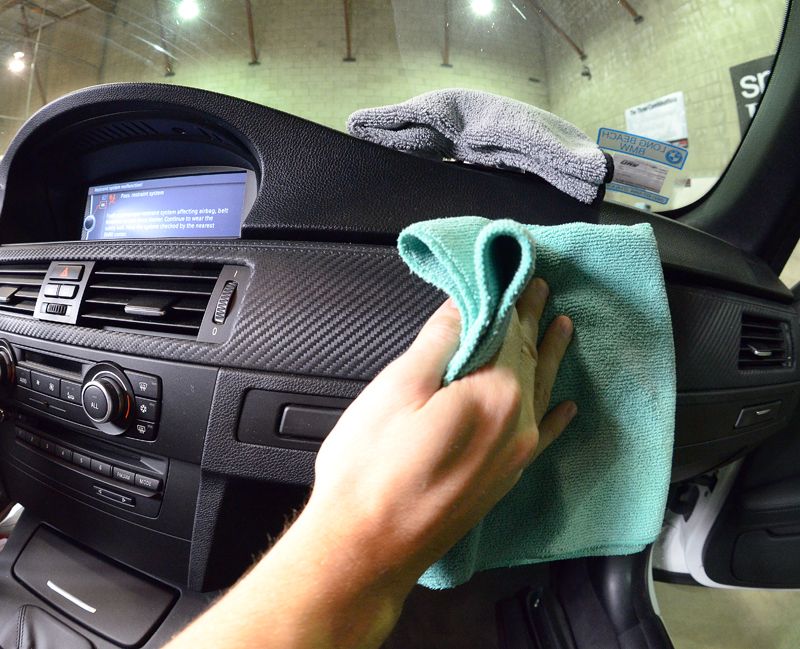
Before/After car detailing
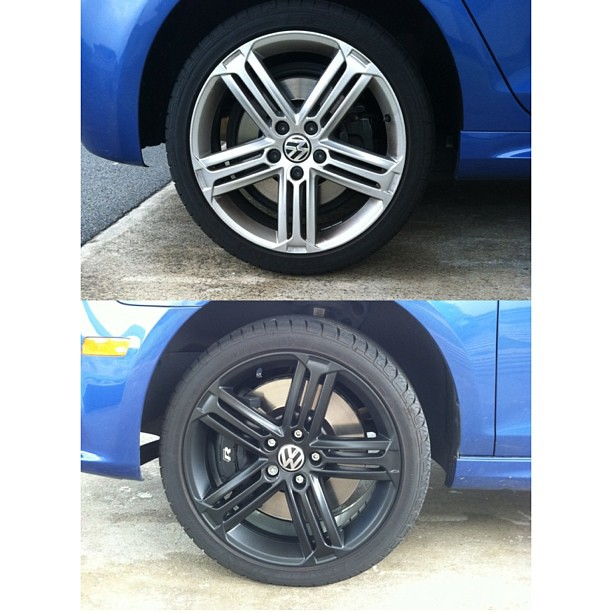
Clay Bar image


How to DIY: Detailing 
Before you detail your car here is a list of the items you will need:

  1. A Car
  2. A Clay Bar (used specifically for detailing a car)
  3. Clay Bar lubricant
  4. Microfiber towel 


Step 1: Wash your car and dry vehicle thoroughly.

Step 2: (Wash your hands and dry them before performing this step.)
Break a piece of clay off from the main bar and shape it with your hands into a flat surface.

Step 3: Work in a small square section of your car at a time (about a foot and a half or 18 in), mist the clay bar lubricant over the area you are going to work with so that every inch is covered in the lubrication.

Step 4: Gently move the clay bar over the misted area and overlap passes going left and right and then up and down (NOTE: do not rely on downward force to clean the paint, you will want the clay bar to absorb the contamination. Some stubborn contamination will require more passes and time to remove!)

Step 5: Continue to work on the area until all contamination is removed. (NOTE: this will happen when the clay bar glide with little resistance across the paint and you will not hear any contamination being picked up by the bar.)

Step 6: You are now finished with you area! Wipe off the excess clay lube with a microfiber towel. Repeat steps 3-6 over the entire car.

Didn't understand any of the steps? Watch the video below for a visual representation of how using a clay bar on you car should be done.

Visual Representation of DIY: Clay Bar

As always, thank you for reading our blog. For any questions or concerns feel free to shoot us an e-mail at cars.isds265@gmail.com. Thank you for your continuous support!!


Sunday, November 9, 2014

Types of Car Detailing


What is Car Detailing?


It is the performance of thorough cleaning, restoration, and finishing of an automobile, both inside and out, to produce a show-quality level of detail.


The two main criteria for Car Detailing are Exterior Detailing and Interior Detailing. 


Exterior Detailing

Exterior detailing is more than just a simple drive down to your local Car-Wash Express. This style of detailing works specifically to wash & restore your cars beauty. Exterior detailing consists of restoring a cars paint, chrome trim, wheels, windows, headlights, spoilers, and any visible component of the exterior of the car. One tool used for this method is called a clay bar.


 A clay bar is pretty much self explanatory
 because its a bar made of clay, but this clay is very, very fine in size. It is small enough to pick the very small contaminants & debris embedded in the paint and remove paint over-spray. These debris & contaminants are the reason why after a regular car wash you start to see 'paint-swirls.' Paint-swirls are the very thin, hairline swirls and around a steady source of light you could see these swirls. A great way to fill in the paint swirl, is to use wax. Coating the car with some wax, helps reduce any new debris and contaminants digging into the newly restored paint.There are also many non-corrosive chemicals to choose from to help bring the shine back into your chrome or plastic parts. 


Interior Detailing


Interior detailing consists of the restoring the upholstery, gauges, steam cleaning, and adding modifications. Interior detailing has changed in the last 50 years or so. Inside automobiles there have been materials used such as leather, vinyl, wood, plastics, carbon fiber composites, and many more. All these materials are great to withstanding a lot of wear and tear from high temperatures resulting from steam cleaning and chemicals. Sometimes these materials don't last for their full life time and need to be replaced. Some companies specialize in reupholstering car seats, ceilings, and basically anything that has fabric or needs fabric installed. When replacing your interior material, you always have the option to change it to your preference. If originally your car had clothed seats and you're not a fan of them, then you can upgrade to leather with little price discrepancy and be happy with your choice.Another key importance of interior detailing is the chemicals used. Make sure you always read the back of the labels and it is correct for the material you are using. Some chemicals may work great on leather surfaces but use that same chemical on wood and it'll destroy its shine.

Stay tuned for next weeks post as we show you how to DIY & learn some new techniques that'll help you detail your automobile!

Sunday, November 2, 2014

Plasti Dip Continued

DIY: Plasti Dip

As you may have read on last week's post, Plasti Dip is a very versatile object. It can be used on nearly any surface of the car(that is non-mechanical) and completely change the look of your vehicle while saving you money as opposed to customizing or modding your car in various other ways, that would cost a ton of money. So here on this week's post we will show you the most common uses of Plasti-Dip and supply the best video for each item. Enjoy!

Most Common Uses of Plasti Dip

  • Alloy wheels,rims,even hubcaps

  • Car Emblems/Badges

  • The entire body of the car or certain parts of the car's body(the roof, grille, trunk, hood)      


  • Tail Lights and/or Headlights 

Alloy Wheels, Rims, Hubcaps 

This is the most common use of Plasti Dip among users of the product. The reason why many people choose to use Plasti-Dip is because it is a very cheap alternative as opposed to buying rims, because when you  Plasti-Dip your car's wheels it completely changes the entire look of your car. Another reason why many people use Plasti Dip on their wheels is to cover curb rash. Below are 2 videos that shows you how to use Plasti Dip on your wheels by either leaving your wheel on the car or taking it off.

1. Taking your wheel off (https://www.youtube.com/watch?v=BOk7E0lMFns)
2. Leaving your wheel on the car (https://www.youtube.com/watch?v=ek1mRhEIbHA)


Car Emblems/Badges

Another common use of Plasti Dip is on car emblems and badges. There are many reasons why people like Plasti Dipping their emblems and badges Some include to blackout their car(make everything from the body, wheels, windows, tail lights black), to match their rims or car, or simply just because they like it. But regardless of the reason, below is another video with shows you how to Plasti Dip your emblems and badges.

(https://www.youtube.com/watch?v=u8Gfd46AxLw)

Plasti Dipping the Entire Car or Certain Parts

Plasti Dipping your entire car or certain parts of your car like the roof, hood, or the trunk is once again is a cheap alternative to going to the body shop to get your car painted. Alternatively it is also cheaper than buying additional parts like a carbon fiber painted hood. Plasti Dipping your car is safe, durable (yet removable) and also a lot cheaper than going to the shop. Below is a video to show you the process of dipping your entire car.

(https://www.youtube.com/watch?v=rNY9Dx617N8)

Plasti Dipping your Tail Lights/Headlights

Plasti dipping tail lights and headlights is the last common use of Plasti Dip on a car. Although tinting your car's headlights and/or tail lights is illegal in most states, it gives a stealthy look that many look for. Below are two videos showing the process to give your car that stealthy look, one shows the use of a stencil to make sure your car's turn signal and reverse lights are not covered by the plasti dip and the other is covering the entire light.

1. Using a stencil (https://www.youtube.com/watch?v=l8jTAIZqOb8).

2. Dipping the entire light (https://www.youtube.com/watch?v=2EShgFOC3Bc).

All in all Plasti Dip is an amazing product. It is relatively cheap, very durable, and can used nearly anywhere on a car. We hope you enjoyed this week's post and find the DIY videos helpful.


Sunday, October 26, 2014

Plasti Dip

Plasti Dip


Want to make your car look better, while also costing less money? The answer? Plasti Dip.
Plasti Dip is an extremely affordable and safe alternative to making your car look nicer and newer.


Can of Black PlastiDip


You're probably wondering what is Plasti Dip, and where can i buy it?


Plasti Dipped BMW
Well the answer is simple: Plasti Dip is a rubber bonding adhesive spray that has a variety of uses, from painting your rims to coloring in your car logos. You can even Plasti Dip your entire car! You can find Plasti Dip in a variety of places, from home improvement stores such as the Home Depot to your neighborhood Wal-Mart. Plasti Dip is versatile and won't cost you more than thirty dollars for several cans that you can use towards making your car look nicer and customized.


FAQ About Plasti Dip (Common Concerns and Myths)

  • Plasti Dip is extremely safe, it doesn't ruin your car/wheel(if used safely and doesn't come into contact with any mechanical parts) 
  • It doesn't come off while washing your car/rim(even a pressure washer won't take it off).
  • However, Plasti Dip is not permanent, where a pressure washer won't take it off, simple nicks and scratches will.
  • In order to remove Plasti Dip you can just pick and peel at it or use a Dip Dissolver* (if it is too thin to peel)


Come back next week as we will show you how to use Plasti Dip and give you some tips.

*Link for Dip Dissolver
http://www.amazon.com/DipYourCar-Dip-Dissolver%C2%AE/dp/B00EKS5FJO

Sunday, October 19, 2014

DIY: Car Engine Oil Change

Changing Your Car's Engine Oil at Home


Today on DIY Car Tutorials and Tips, we're going to show you how to save money by changing your car's engine oil at your own home today.

Things you will need: 

DIY STEPS:

  1. Drive your car onto a leveled place free of stains. 
  2. Jack your car up (if necessary) and place your stands in appropriate spots.
  3. After making sure your car is secure, go underneath it and locate the drain plug.
  4. Place your oil collecting pan underneath the drain plug.
  5. Using the appropriate wrench open the drain plug and let the oil drain completely.  
  6. Once the oil is all drained, check the seal on the drain plug before tightening it back up.Change Your Oil
  7. Now locate your oil filter. 
  8. Move the oil pan underneath the filter now.
  9. Using either your hand or your oil filter wrench loosen and remove the filter and let the oil drain once again.
  10. Once oil has stopped dripping, wipe the edge.Change Your Oil
  11. Get your new oil filter and lubricate the oil seal.
  12. Now put the new oil filter in and tighten it up by hand.
  13. After doing so get back up and remove the stands and release the jack.
  14. Now pop open your car's hood and open the engine cap.
  15. Fill the engine up with the appropriate engine oil with the appropriate amount (check your car's owners manual or online for the capacity).
  16. Check your engine dipstick, once your reach close to your engine's capacity, to make sure you don't overfill.
  17. Start the car up and let it run for about 3~5 minutes and make sure it is not leaking any where.
  18. Get rid of the used oil safely. (you can go to a nearby oil recycling location or contact one to pick up your used oil).

We hope these steps were useful and informative to help you learn how to change your car's engine oil at home. If they are unclear or you simply are a visual learner, feel free to watch the video below.

 (https://www.youtube.com/watch?v=kCcGJ74HVHU)


Sunday, October 12, 2014

Importance of Oil Changes

Oil changes 


How important are Oil Changes?

Ever since you had your driver’s license, you have been hearing your parents nagging you about not forgetting to get an oil change, but how important is it really? Well, it's actually very important.  The consequences of not having any oil in your engine could mean total engine failure. When an engine is running, it is creating an excess amount of friction. This friction can cause the metal in the pistons and valves to start shredding, resulting in total engine failure. To avoid this problem one must perform an oil change. Oil changes are required because motor oil breaks down the chemical structure over time with excessive amount of heat and energy. 


What is a Oil Filter?

Along with oil, oil filter changes are just as important as actual fluid changes. The filter helps capture small shrapnel and debris caused by the intense friction in the engine.  A great tip everyone should do when changing his or her oil filters, is to attach a small magnet on the back of the filer. This helps attract and capture all the tiny metal debris in the filter thus reducing internal engine damage.


How Often Should I Do Oil Changes?

Oil changes can be performed every  3,000 to 5,000 miles or sometimes even more depending on the car manufacturer and the type of  oil in the vehicle.  There are a few types of automotive oils such as: Fully Synthetic Oil, Synthetic Blend, and Standard Conventional Motor Oil. The only main differences in these oils are improved chemical structure to help prolong the breakdown of the oil, thus costing a little more for better quality motor oil.


Oil Viscosity(thickness) 

Depending on the make and model of you car as well as your geographic location, the manufacturer has outlined in your cars owner's manual what grade your car's engine takes. Basically what the oil viscosity means the oil's resistance to flow and also how it flows at lower temperatures. For example when comparing 5W-30  and 10W-30 motor oil they both are the same weight (or thickness, hence the 30) however 5W-30 will flowing easier when comparing the two at the same lower temperature. Remember always use the grade of oil that your manufacturer recommends unless you location is always cold, or always hot, then you can switch oils that are better suited for your climate.


Hopefully this helped teach you how seriously important oil changes really are. If not watch this video!

                                                                      Click for Video


NEXT WEEK ON DIY CAR TUTORIALS AND TIPS
Stay tuned for next week's post as we will show you how to save money by changing your car(s) motor oil at home instead of going to the mechanic or dealer.


Sunday, September 28, 2014

Synthetic vs Regular (Conventional) Motor Oil

What's the Difference? 

First of all the primary function of motor oil is to lubricate all of the crucial parts of the car and keep the engine from heating up and from wear and tear.

The difference between synthetic motor oil and regular motor oil lies in the composition of the oils. Conventional motor oil is made from crude oil which has additives mixed into the base oil while synthetic oils are made using a special "synthesized" base oil where all of the oil molecules are an ideal weight and consistent in size.

What does this mean?

This means that synthetic oils are superior to conventional motor oils in the sense that:

  1. The synthetic oil will have an extremely stable engine oil that will flow at a large variety of temperatures in comparison to conventional oils
  2. The synthetic oil will have improved lubricate properties to have better protection from engine wear, decreased oil consumption, and improved fuel mileage
  3. The synthetic oil can clean out build ups of waxes and sludge left by conventional oils. 

The age of the vehicle can play a major role in which oil to choose, and you should always refer to the manufacturer's recommendations before making a decision on which oil to use.


*IMPORTANT*
Depending on the condition of your car, if you start using synthetic oil consult with a mechanic and see if it is okay to go to back to regular conventional oil.
(taken from https://www.mobiloil.com/USA-English/MotorOil/Car_Care/AskMobil/Switching_Synthetic_Motor_Oil.aspx)
Synthetic vs Conventional Motor Oil

Where to buy Synthetic oil?

http://www.amazon.com/s/ref=sr_nr_n_1?rh=n%3A15719391%2Ck%3Asynthetic+oil&keywords=synthetic+oil&ie=UTF8&qid=1412545368&rnid=2941120011&ajr=2

-Depending on the make and model of your car you can use the link above to use Amazon's filtering option that will specifically find synthetic oil that fits your car(s) oil grade need.


Synthetic Motor Oil


-Alex H.

Convetional Motor Oil